Saturday, April 21, 2012

Coconut cake

I've been testing out coconut cake recipes for a cupcake idea I had (check out my other post). I wanted to make a coconut cupcake, with dulce de leche frosting and chocolate covered pretzel/kettle corn bits.


Yummy cupcakes!
The cupcakes came out really well! The 2nd recipe, Coconut Loaf, was my first trial recipe in the search for coconut cake. Taste testing my cousin's coconut cupcake in Shanghai made me wary about using shredded coconut in the cake. The cake was dense, and gooey, and most of the shredded coconut had descended to the bottom of the cupcake.  But I felt that the Coconut Loaf didn't have enough of the coconut flavor I was looking for. Luckily I found a bag of desiccated coconut in my pantry, which solved my fear of shredded coconut. Desiccated coconut is finer than shredded coconut. You can pulse shredded coconut in the blender or food processor to break it into smaller pieces, or grated fresh coconut. 


Coconut cupcakes


Coconut cupcakes adapted from a recipe courtesy of the Polynesian Cultural Center
Prep Time: 30 minutes; Cook Time: 35 minutes; Total Time: 1 hour, 5 minutes; Yield: 30 cupcakes
Ingredient
2-1/2 cup cake flour
2-1/4 teaspoon baking powder
3/4 teaspoon salt
2 cup sugar
1 cup butter, softened
5 eggs, separated
1-1/2 teaspoon vanilla
1 cup coconut milk
3/4 cup desiccated coconut
1-1/2 teaspoon grated lemon rind (optional)
Preparation
Preheat the oven to 350 degrees Fahrenheit. Line your cupcake/muffin pans. Sift the flour, baking powder and salt into a bowl. Cream the butter in a separate bowl. Gradually add the sugar to the butter and beat until consistency is light. To the butter mixture, add one egg yolk at a time, beating in between additions.
Add 1/3 of the flour mixture at a time to the butter mixture, alternating with the coconut milk. End by adding the flour mixture. Scrape down the sides of the bowl and the beater. Add the coconut and lemon rind. *If you don't own an electric stand mixer, like me, fold in the milk and dry ingredients to prevent flour from flying everywhere and over-mixing. 
In a separate bowl, beat the egg whites until stiff, but not dry. Gently fold half the egg whites into the cake batter until thoroughly incorporated, and then fold in the second half. Spoon into lined cupcake tins, about 2/3s way full. Bake until a toothpick comes out clean from the center of the cakes (about 30-35 minutes) . Cool before icing.

*You can also use powdered coconut milk instead of canned coconut milk. Instead of mixing it with water, mix it with milk (or soy milk). If you want a more intense coconut flavor, used condensed coconut milk which you can make by reducing canned coconut milk. From epicurious - For reduced coconut milk:
Bring coconut milk to boil in large deep saucepan over medium-high heat (coconut milk will boil up high in pan). Reduce heat to medium low; boil until reduced to 1 1/2 cups, stirring occasionally, 25 to 30 minutes. Remove from heat; cool completely. Transfer to small bowl. Cover; chill (coconut milk will settle slightly as it cools). DO AHEAD: Can be made 2 days ahead. Keep chilled.

Coconut Loaf


Coconut Loaf adapted from Epicurious
Ingredients
1 stick butter
2 cups flour
1 cup of sugar
3 eggs, separated
1 cup slightly reduced coconut milk
1 teaspoon baking powder
1/2 teaspoon baking soda
1/2 teaspoon salt
Preparation
Position rack in center of oven; preheat to 350°F. Grease and flour two loaf pans. Whisk flour, baking powder, and salt in medium bowl. Using electric mixer, beat butter in large bowl until smooth. Add sugar; beat on medium-high speed until well blended, about 2 minutes. Add egg yolks, 1 at a time, beating well after each addition and occasionally scraping down sides of bowl. Fold in half of flour mixture, and half of the cup of reduced coconut milk; mix just until blended. Fold in remaining flour mixture and coconut milk. Divide batter between the two loaf pans. Bake until tops spring back when gently touched and tester inserted into center comes out clean, about 40 - 45 minutes. Transfer loaves in pans to rack; cool 10 minutes. Carefully remove loaves from pans and cool completely on rack.


Dulce de Leche


Making your own dulce de leche is very easy. All it involves is a can of condensed milk. To make your own dulce de leche, check out Baking Basics for different methods. I used the oven method.

My first batch of homemade dulce de leche was a mishap. Water had leaked into the pan of condensed milk, which made it extremely watery and unusable for the frosting. It looked more like a dulce de leche milk drink. Luckily I had just purchased a new ice cream maker two weeks ago! (Cuisinart 1-1/2 Quart Automatic Ice Cream Maker at Costco for $35.99 including tax, what a great deal!) What better way to break in my new ice cream maker than to make dulce de leche ice cream?
Freshly churned ice cream


Scoop of dulce de leche ice cream!


Dulce de Leche Ice Cream adapted from Smitten Kitchen

2 cups watery dulce de leche
1 cup heavy cream
1/8 teaspoon pure vanilla extract


Preparation
Bring cream and dulce de leche to a boil in a 3-quart heavy saucepan over moderate heat, whisking. Whisk in vanilla and transfer to a medium sized bowl. Chill in the fridge until ready to use (remember to freeze the freezer bowl of your ice cream maker at least 6 hours prior to use).
Churn in ice cream maker until almost firm, about 30 minutes. Add nuts into the ice cream maker while the ice cream is still slightly soft, about 5 minutes before the ice cream is done. Transfer ice cream to an airtight container and put in freezer to harden, at least 1 hour.
It's creamy and light. If you want an ice cream with stronger dulce de leche flavor, refer to the original recipe linked above. If you would like dulce de leche swirls, drizzle dulce de leche into the ice cream maker right before the ice cream is finished churning.

Dulce de leche frosting


Dulce de Leche Frosting adapted from Joy the Baker
Ingredients
1/2 cup (1 stick) unsalted butter, softened
8 ounces cream cheese, softened
3/4 cup dulce de leche, plus more for drizzling
1/4 teaspoon salt
2 to 3 cups confectioner's sugar
Preparation
Beat the cream cheese in a bowl with an electric mixer on medium speed for about 30 seconds, until very soft and pliable.  Scrape down the sides of the bowl, and add the butter and dulce de leche.  Beat on medium speed until well incorporated.  Add the salt, and powdered sugar slowly.  Beat on medium speed for about 3 minutes, until fluffy and lighter in color.  Generously spoon frosting on top of cupcakes, or use a large frosting tip to pipe on frosting.
I used 2 cups of confectioner's sugar. Use 3 if you prefer a stiffer frosting. 

Enjoy!


Saturday, April 14, 2012

Passover recipes

I've been working on this post for a while, and unfortunately it's being posted at the very end of Passover. I hope you turn back to these recipes next year as you're preparing for Passover.

Last Friday evening marked the start of Passover, which means no leavened products, and also means much cooking to be done. I'd been planning what I was going to make this Passover, since I'd purchased a case of Matzoh from Costco and actually had a full, functioning kitchen this year. Costco saves my tuchus (the one in Rigo Park). Last year they had chocolate seder plates, this year they had an assortment of chocolate goodies from Barton's and frozen kugels (broccoli, cheese, and apple).


 They were convenient to pop in the oven, or the microwave. I haven't had the apple kugel yet since I made my own, but the potato and broccoli kugels were nice and moist (although a little heavy on the salt) and the latkes were very fluffy. I also purchased some Shahat cheese, which was interesting but not my preference where cheese lies.
When I first opened it, I thought it had molded
I thought I'd never make it through the case of Matzoh, but surprise! I only have 2 boxes left. I used one entire box of Matzoh for my first batch of apple kugel, because the tray seemed too big. However, when it came out of the oven, it was so bland, and flavorless. I had forgotten to double the sugar! It was also dense and dry, and I had already added extra moisture to the mixture.  

On my second attempt, I used less matzoh, but soaked the matzoh longer, making sure it was nice and soft. I also broke the matzoh into very small pieces, which made it easier for the matzoh to soak up the water, and get nice and soft. I decided to add orange San Pellegrino on a whim, after checking the ingredients. I thought about how to add moisture back into the kugel, and thought about apple pie. I use orange juice in my apple pie, and seltzer in my matzoh balls. I didn't want the kugel to be dense and heavy, so I thought the orange soda might be a nice touch to keep the kugel light and moist. This kugel takes longer to cook because of the added moisture from the soda. The liquid takes longer to cook out, but adds a nice bright flavor to the kugel. 


This is the recipe for the second batch, adapted from Erika's Kitchen.
Apple Matzoh Kugel
Prep time: Cook time: Total time: Yield: 12 servings
Ingredients
7 sheets matzoh 
5 eggs 
2 large apples, peeled, cored and grated 
1/2 cup granulated sugar 
2 tsp cinnamon 
4 Tbsp melted butter or margarine
1/4 cup milk
1 can orange soda (San Pellegrino, contains no corn products)
Instructions
Preheat the oven to 350 degrees. Break the matzoh into smallish pieces in a 9 x12 baking pan.  Run hot water over the matzoh until it's covered and let soak about 8-10 minutes, until the matzoh is soft. Drain the matzoh into a colander, and press the soaked matzoh to remove as much water as possible. Beat the eggs with the milk in a large bowl.  Combine the soaked matzoh, apples, sugar, cinnamon, butter or margarine, and can of soda. Let the mixture absorb the soda for 5 minutes, and pour in the egg and milk mixture. Pour the mixture into the prepared baking dish and bake about 1.5 hours until the edges are browned, the top is golden, and the kugel is firm. Serve as a side dish or dessert. Can be eaten hot or cold.

We brought this second kugel, as well as a fudge pie to his family's second Seder, and ended up coming home with more food than we brought!


The best thing we came home with, flourless chocolate cake
We ended up grinding several boxes of matzoh in the blender, to make matzoh meal (for matzoh balls, and latkes).  For matzoh balls, you must blend the matzoh until it is very fine. The very first attempt at making matzoh balls last year turned out miserably because I didn't grind them. I smashed them and this is what happened:
They were way too dense!


They should look like this, freshly cooked ^_^
Matzoh Balls adapted from Smitten Kitchen
Prep time: 35 minutes; Cook time: 30 minutes; Total time: 1 hour 5 minutes; Yield: 7-10 balls
Ingredients
1/2 cup matzo meal (finely ground)
2 eggs, lightly beaten
2 tablespoons vegetable oil
1 teaspoon salt
1/4 teaspoon black pepper
1 tablespoons chicken stock 
2 tablespoons seltzer
Instructions
Mix all the matzo ball ingredients in a bowl. Cover and place in the refrigerator for 30 minutes.
Bring a medium sized pot of well-salted water to a boil before reducing the flame. Make sure your hands are thoroughly wet before forming the maztoh balls. Form matzo balls by dropping spoonfuls of matzo ball batter approximately 1-inch in diameter into the palm of your wet hands and rolling them loosely into balls. Drop them into the simmering salt water one at a time. Cover the pot and cook them for 30 to 40 minutes.

Matzoh ball soup!
About ten minutes before the matzo balls are ready, bring prepared chicken stock to a simmer with the sliced carrot in it. Ladle some soup and a couple matzo balls into each bowl and serve! (I'll share my chicken stock recipe another day!)

Two on left are mine, one on right is from Costco
Potato Latkes
Prep Time: 20 minutes; Cook Time: 15 minutes; Total Time: 30 minutes; Yield: 12-15 latkes
Ingredients
3 Russet Potatoes, grated
1/2 medium onion (finely chopped through the blender)
2 medium eggs, lightly beaten
1 teaspoon salt
1/2 teaspoon pepper
2 tablespoons matzoh meal
Vegetable oil for frying

Instructions
In a cheesecloth, wring the moisture out of the grated potatoes and onion. Then mix together with the rest of the ingredients. Scoop a heaping spoonful into your hands and shape into patties. Heat a skillet over high flame, and drizzle some oil into the pan. Reduce the flame to medium, and drop the patties into the hot oil. Cook the latkes over medium heat until gold brown on one side (about 2 minutes) and flip onto the other side. Once they're done, pop them out of the skillet onto a plate or tray lined with paper towels. This will soak up any excess oil on the latkes.

Enjoy! I like to eat mine with a dollop of sour cream and wedge of goat cheese.

What is a Jewish holiday without brisket? (Maybe Yom Kippur ;P )
Even though I don't eat meat, I tackled brisket so that Dede would have something other than kugel, and latkes. I purchased the brisket, which was kosher for passover, from Trader Joe's (about $17.00). The package came with instructions, so I vaguely winged it by combining some instructions from the web and the instructions on the package.


I seared it, as the package said, on either side. Afterwards, I rubbed it with a little minced garlic, salt, pepper, freshly minced rosemary, dried oregano, paprika, and chili powder. The package said to let it sit in a roasting pan on 350 F in the oven for 3-4 hours, covered with vegetables if so desired.
Roasted Vegetables


I let the roast cook for the first hour without vegetables and meanwhile quartered some yukon gold potatoes, sliced some carrots and mushrooms, and tossed them with a little oil and the same spice mixture. Then I covered the roast with the vegetables and let it cook altogether for the remaining 2 hours. Let the brisket rest 5 minutes on the cutting board before slicing.

In addition to brisket, I also attempted cholent. I had never had cholent, had only watched the making of cholent in a documentary about Passover in a class on religious food traditions. I pulled out my brand new slow cooker just for this (I use a gas stove/oven and am uneasy about leaving it on for 12 hours).

Beginning of the process

Cholent adapted from NY Times:“Quick & Kosher: Recipes From the Bride Who Knew Nothing,” by Jamie Geller
Prep time: 10 minutes Cook Time: 12-15 hours; Yield: 2 1/2 quarts
Ingredients
2 medium potatoes, peeled and cut into 1 1/2-inch chunks
1 medium onion, peeled and cut into 1 1/2-inch chunks
1/2 to 1 pound boneless beef short ribs, cut in 1 1/2-inch chunks (having already been kashered)
Pepper, to taste
3/4 cup pearl barley
3 cups chicken broth
2 tablespoons paprika
Salt to taste
1 small can tomato paste

Instructions
Line the bottom of a slow cooker with the potatoes, the onion and then the short ribs, sprinkling the meat with pepper to taste. Add the can of tomato paste, and scatter the barley on top, then pour in the broth. Sprinkle with the paprika and salt to taste. Add enough water to cover all the ingredients. Cook on low for 12 to 15 hours, stirring occasionally (except during Shabbat, for those who observe it), adding more water when necessary. The longer the cholent cooks, the better it will be.

The final result!

The final recipe of the day is one which I forgot to take a picture of. It is a fudge pie with matzoh cracker crust. I was inspired by the idea of a graham cracker crust and thought I could replicate it with ground matzo. We were supposed to make chocolate covered strawberries, but I had already cut and frozen the strawberries. I thought the next step could be to make a fudge pie with a matzoh crust, and line the bottom of the crust with the thawed strawberries. The fudge pie filling is adapted from a easy fudge recipe I read on the back of an Eaglebrand condensed milk can as a little girl. It was my go to recipe growing up, for bakesales, treats to bring to school, because it was quick and easy.

Matzoh Pie Crust
Prep time: 5 minutes; Cook time: 10 minutes; Total time: 15 minutes; Yield: 2 pie crusts
Ingredients:
1 1/2 cups finely ground matzoh meal
1/3 cup white sugar
6 tablespoons butter, melted
1/2 teaspoon ground cinnamon
additional vegetable oil

Instructions
Mix the first 4 ingredients in a medium sized bowl. Because matzoh is so dry, the butter won't be enough to coat all the matzoh crumbs. Drizzle a few more tablespoons of vegetable oil, until all the crumbs are thoroughly coated in oil. This will make it easier for you to press the mixture into pie tins. Bake at 375 F for 10 minutes. Cool for 15 minutes.

Fudge Pie Filling
Ingredients
1 stick of butter
1 can of condensed milk (Carnation, kosher for Passover)
12 oz semi-sweet chocolate chips
dash of salt
1 teaspoon vanilla extract

Instructions:
Melt the stick of butter in a saucepan, add the condensed milk, vanilla extract, dash of salt, and semi-sweet chocolate chips. Continuously fold the mixture, mixing the chocolate in while it's melting, preventing any burning on the bottom of the pan. Once all the chocolate has melted, and the mixture is smooth, pour into prepared pie crust. Chill in fridge for 2 hours, or until filling has set.

You can line the pie with fruit, as I did, but I would opt not to. The strawberries ended up making the crust soggy on the bottom. Otherwise, fill with a light layer of fudge, chill so the fudge sets up slightly, and then layer with fruit, and pour another layer of fudge filling over the fruit. That way the fruit isn't directly soaking down into the crust. 


Enjoy! And as the sun is setting and marking the end of this Pesach, I hope you have all had a great and happy Passover this year.

Wednesday, April 4, 2012

Almost Vegan Avocado Chocolate Nutella Cupcakes


It all started with a bag of ripe avocados from Costco. I had originally purchased them to spread on my paninis. And I had, but then forgot about them until my mother pointed out that if I didn't use them fast, they'd be headed for the bin. What to do with 3 medium, ripe avocados? Why, try my hand at making a vegan cupcake of course! 
I was inspired by Joy the Baker's recipe, but didn't want to spend the amount of time trying from scratch.  My first attempt involved mixing 1/2 a cup of blended avocado, vinegar and baking soda (egg substitute), and substituting the dry ingredients in the recipe with Ghirardelli Brownie Mix (also had some left over from Costco which I was trying to use) and tweaking here and there. I found out that vinegar and baking soda serves as an egg substitute. 1 tbspn to 1 tspn baking soda is equivalent to 1 egg. They turned out not like cupcakes, but as cake-like brownies. The addition of avocado was not as moist as I would have thought (I've turned same brownie mix into moist fluffy cake with bananas before).
Attempt #1


 I reserved another 1/2 cup of avocado to add to my favorite dressing in the fridge, a lemon tahini dressing from People's Pint. The remaining avocado, about 1 cup, I folded in a medium bowl with about 1 cup of Nutella. I was attempting to make a frosting, and added about 8 oz of melted semi-sweet chocolate. The result was slightly dry and grainy, but adding about 1/4 cup of soy milk made the frosting nice and smooth. However, I decided to transform the frosting into a from scratch cake batter since the first attempt at vegan baking did not work out. The second attempt turned out much better, but does not match up to a non-vegan chocolate cake in taste. I will continue to experiment in the future until I find a satisfactory substitution.
Attempt #2
Almost Vegan Avocado Chocolate Nutella Cupcakes
Yields 24 cupcakes; Prep Time: 30 min; Cook Time: 30 min
Ingredients:
1 medium avocado, blended
1-cup soymilk
1 cup Nutella
1-cup vegetable oil
8 oz semisweet chocolate
3-tablespoon white vinegar
3-teaspoon baking soda
2-teaspoon baking powder
1-tablespoon salt
½ cup sugar
2 cups of flour
Directions:
1.     Pre-heat oven to 350 degrees F, line or grease two 12-cup cupcake pans
2.     Blend 1 medium avocado until smooth. Fold into 1 cup Nutella in medium bowl
3.     Melt the chocolate in a heatproof bowl over a simmering pan of water
4.     Fold the avocado and Nutella mixture into the melted chocolate, and add the sugar.
5.     Fold ½ the remaining wet ingredients, oil and soy milk into the chocolate mixture. Then fold the vinegar in.
6.     Gently fold the dry ingredients (sifted in another bowl) into the wet mixture.
7.     Add remaining wet ingredients to batter. If the batter is too dry for you, add a little more soy milk
8.     Scoop into lined/greased cupcake pans. Bake at 350 degrees F for about 30 minutes.
The additional 2 tspns of baking powder make the batter lighter and fluffier since we can’t use normal ingredients like egg whites, buttermilk, or sour cream. The soymilk also serves as a substitute for those ingredients as well, making sure that the batter isn’t too dry. We gently fold all the ingredients in because we don’t want to risk over mixing or deflating the batter.  

* I found out from a friend that Nutella isn't vegan after all, so these have become the almost-vegan chocolate nutella cupcake. To make an entirely vegan version of this recipe, substitute Nutella with vegan nutella (recipe linked). 

Key Lime Pie


My favorite pie is key lime pie, there's nothing as satisfying as a slice of key lime pie in the summer, sweet, tart, cool and creamy. Sometime I dream about key lime pie, especially when I was in college and craving a slice from California Pizza Kitchen. What I love about that pie is the graham cracker crust. Give me a key lime pie on an excellent graham cracker crust and I'm sold.
Before I made Key Lime pie, I researched the heck out of it first (which is usually what I do when broaching a new recipe). I like to use Joy of Baking as a go-to guide for baking. It has detailed descriptions of what makes up each item, and easy to follow instructions.
Here is the very simple recipe from Joy of Baking. I did not include the graham cracker crust since I used a kosher for passover coconut macaroon crust instead.
A slice of tart, creamy heaven... it even has clouds!
Key Lime Pie
1 pre-prepared graham cracker crust, or coconut macaroon crust
Filling:
3 large egg yolks,room temperature
One 14 - ounce (390 grams) can sweetened condensed milk
1/2 cup (120 ml) key lime juice (can use regular limes)
2 teaspoons grated lime zest (outer skin)
Topping:
1 cup (240 ml)cold heavy whipping cream (double cream) (35-40% butterfat content)
2 tablespoons (30 grams) granulated white sugar
Filling: 
In a bowl, beat the egg yolks with an electric mixer until pale and fluffy (2-3 minutes). Gradually add the condensed milk and beat until light and fluffy (3-5 minutes). Scrape down the sides of the bowl and then beat in the lime juice and zest.
Pour the filling over the crust and bake for about 10 - 15 minutes, or until the filling is set. Remove from oven and place on a wire rack to cool. Once it has completely cooled, cover and refrigerator for several hours or overnight.
Once the filling has chilled, in the bowl of your electric mixer, with the whisk attachment (or with a hand mixer), beat the whipping cream and sugar until stiff peaks form. Either pipe or place mounds of whipping cream on top of the filling. Can be stored in the refrigerator for a few days.
Makes 1 - 9 inch (23 cm) pie or tart.
* You could use a piping tip, but I just filled a ziploc bag with whipped cream, and snipped off the end
Key lime pie on a hot summer's day
Since Key Limes are a seasonal ingredient, we only get to make key lime pie in the summer. But how I crave Key Lime pie all year!

If you can get your hands on some Key Limes before then, this would make a great Passover dessert, seeing as how Passover is coming right around the corner this Friday. Or perhaps try it out with the juice of regular limes.

Passover means that many days of cooking are ahead. Stay tuned for the recipes I'll be posting!

Sunday, February 12, 2012

For the Love of Pie


Dessert is a beautiful, beautiful thing. It allows me to bake, and ply Dede full of sweets. Pie is his favorite, especially berry pie. In our household, there is berry pie all year long. Mostly this is because berries are another fruit staple in our household. And when they desperately need to be used, there are two ways to use berries. The first is my mother's way, cook all the fruit in the household into "fruit soup" which is just hot fruit juice. The second is my way, make berry pie. I use whatever it is that we have in the fridge, which is why my berry pie always comes out different, and why there is no exact measurement for how many berries you will need. Now I'm not actually going to post a pie crust recipe (yet again!) because I haven't yet found one that I liked. I used to make mine with shortening, but a close friend swore up and down that cream cheese was the way to go. Obviously I must continue to tinker about in the kitchen until I find the flaky crust of my dreams.
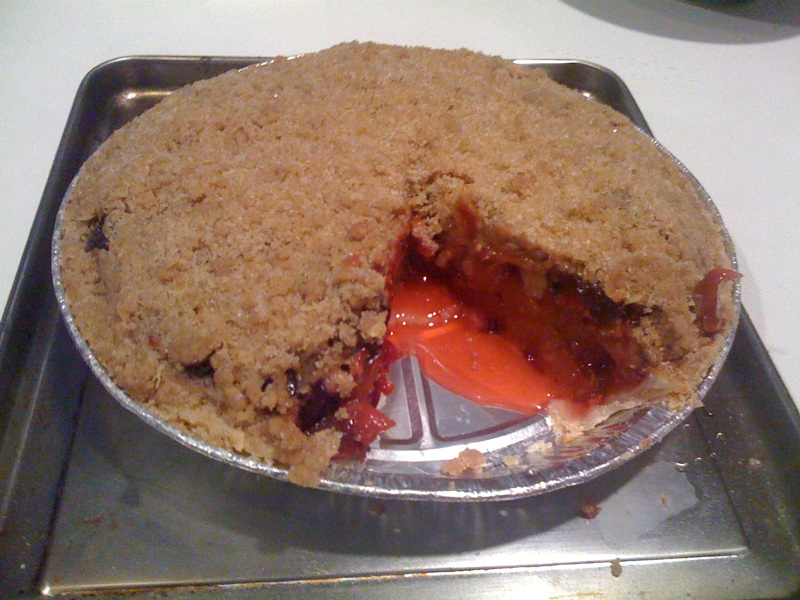
Berry Crumble
Freeform Berry Pie
Use your favorite pie crust recipe, or a pre-bought pie crust.
All the berries in your fridge that need to be eaten
1 cup of sugar, or 1/2 cup of fruit jam/preserves
1/4 cup orange juice (if you don't have any, just use water)
Instructions
Wash, drain, and cut all the berries
Combine the berries, juice, and sugar in a large saucepan over medium heat
Cook over medium heat for 10-15 minutes, just to break down the berries and release their juices. Take the berries off the heat and drain, making sure the reserve the liquid in another bowl. Toss the berries with a little flour or cornstarch and sugar before filling your pie crust. Usually I have plenty of berries leftover, so I put them back in the pot with the reserve liquid over medium heat to continue to break down. You want to cook the remaining berries down until the liquid has thickened to make preserves. This usually takes another 30-40 minutes, but you could speed this process up by adding a roux, or a little cornstarch to the pot. If you only have the reserve liquid left, it makes a great mixer for drinks, or add cornstarch to make a jelly.
* If you opt not to use sugar, but to clean out some old jars of jam, then whisk the jam until smooth with the juice or water first before adding to the berries in the pot.
How to top your pie: as pictured above, you could use a crumble topping. If you bought pre-prepared pie tins, then a crumble is a great solution. It's simple butter, sugar, and flour. I used a crumble mix since I already had one on hand. If you bought pie crusts, then obviously you can use the second pie crust to seal off the pie. Bake at 375 deg. F on a sheet pan (it will catch any juices bubbling over) for 40 minutes

There are also a few ways in which pie can also be very romantic (and I don't just mean sliding a ring into the pie). You can top the pie with cookies, we often like to use the pre-cut pillsbury sugar cookies that have images printed on them (you can use them for different occasions like Easter pie, or Halloween pie as well). Since cookies require less time to bake, bake the pie halfway first, take it out of the oven and slide the cookies on top, put back in the oven and continue to bake.
Love pie, using the pre-cut pillsbury valentine cookies
Last, but not least, proposal pie ...
I used shortbread cookies and cut the letters into the shortbread squares
Actually, it was more of a crumble. I came up with this during the summer when I had some extra shortbread cookie dough left over. Dede had been brainstorming for many months on how to propose, and taking pitying on the poor man, I came up with this idea. Not that this is actually how he proposed, but he was so happy when he saw it. It also happened to provide good inspiration for a proposal blog post.
And this is how we ate the proposal pie, in a mug with a big scoop of ice cream

Pizzas Galore!


There's nothing like a great slice of pizza. My mouth is watering, thinking about a fresh hot slice, especially when I'm in need of comfort food, or in the middle of the night when I've been out having a few drinks with some friends. As a New Yorker, I always thought that great pizza came on thin, crispy crust. But when I went to college, the Chicken, Bacon, Ranch sicilian at Antonio's taught me that great pizza also comes on a thick, flaky crust. So if you live in New York, and haven't experience the wonder of Artichoke Pizza, head on down to 14th st. between 1st and 2nd aves. Just this morning, in the wee hours before dawn, we grabbed ourselves some Artichoke pizza, and it was the best goshdarn thick crust pizza I've had since Antonio's. It was like artichoke and spinach dip, on a thick, flaky crust.  I will dream about this pizza, but I won't have to in the middle of the night because the best part about Artichoke Pizza is that it's open until 5am. If only I hadn't stuffed my face with it and taken a picture for this post. 

Before I started making pizza, I thought it was one of those things that would be hard to make at home. Oh, how I was wrong. Pizza is one of those things that is incredibly easy to make. Once you have a dough you like, you can put whatever you want on it.

My go to recipe is a pizza dough from Tyler's Ultimate. I don't have a stand mixer, so if you want the stand mixer instructions, follow the link to the original recipe.
Pizza Dough
1 package active dry yeast
1 teaspoon sugar
1 cup warm water
1 tablespoon kosher salt
Extra-virgin olive oil
3 cups all purpose flour, plus more for dusting
Instructions
In a large bowl, combine the yeast, sugar, and warm water; whisk gently to dissolve. Let the mixture stand until the yeast comes alive and starts to foam, about 5 to 10 minutes.
Add the salt and 2 tablespoons of olive oil. Add the flour, a little at a time, whisking until all the flour has been incorporated. When the dough starts to come together, switch to a spatula to slowly fold the flour into the dough. Get a feel for the dough by squeezing a small amount together: if it's crumbly, add more water; if it's sticky, add more flour - 1 tablespoon at a time. Mix until the dough gathers into a ball, this should take about 5 minutes.
Turn the dough out onto a lightly floured surface and fold it over itself a few times; kneading until it's smooth and elastic. Form the dough into a round and place in a lightly oiled bowl, turn it over to coat. Cover with plastic wrap or a damp towel and let it rise in a warm spot (i.e. over a gas pilot light) until doubled in size, about 1 hour. This is a good time to stick a pizza stone, pan, or baking sheet in the oven and pre-heat to 500 degrees F.
Once the dough is domed and spongy, turn it out onto a lightly floured counter. Roll and stretch the dough into a cylinder and divide into 3 equal pieces. Cover and let rest for 10 minutes so it will be easier to roll out.
Roll or pat out a piece of dough into a 12 inch circle, about 1/8-inch thick. Dust a pizza paddle with flour and slide it under the pizza dough. Brush the crust with a thin layer of olive oil, and top with your favorite flavors. Slide the pizza onto the hot stone in the oven and bake for 12 to 15 minutes, until the crust is golden and crisp. Repeat with the remaining dough.

Now what are some great flavors you can put on your pizza?
Breakfast pizza, it disappeared so fast I barely got to take this picture
This is one of my favorites
Breakfast Pizza
3 tablespoons pesto (I use store bought, often Costco)
1/2 cup halved grape tomatoes (heirloom in the picture)
1/3 cup sliced mushrooms
couple slices of chopped canadian bacon, or regular bacon (as much as you want on the pizza)
4 slices of aged provolone
1 cup shredded parmigiano-reggiano or pecorino romano
1 tablespoon olive oil
Two eggs
Instructions
This is a thin crust pizza, so you want to roll it out thin, about 1/8 inch. Use 1/2 of the dough you've made from the recipe above. Slide the dough onto a oiled sheet pan.
Brush the top of the dough, especially around the crust, with olive oil. Then, using a spoon, spread the pesto thinly over the surface. Break your provolone slices into large pieces and scatter over the pesto. Top with the parm-reggiano.
Evenly distribute the halved tomatoes, mushrooms, and bacon over the surface of the pizza before popping into a pre-heated 500 degree oven. Bake for 5-8 minutes before pulling the pizza out of the oven. Crack the eggs over the top of the pizza and pop back in the oven for another 5-7 minutes or until the cheese has a nice caramelized crust.
Mushroom and Mexican Blend Pizza
This is a thick crust pizza. I used a pizza pan (doubles as a grill pan) to bake this pizza.
Mushroom and Mexican Blend Pizza
3 tablespoons tomato sauce
1 cup Mexican blend cheese
1/2 cup Parmigiano-Reggiano or Pecorino Romano
1/2 cup sliced mushrooms
1/4 cup halved grape tomatoes *optional
Instructions
Roll the dough out into a circle, about 1/3 to 1/2 inch thick. Slide onto your pizza stone, or oiled pizza pan.
Brush with a little olive oil, and spread the tomato sauce over the surface. Layer first the mexican blend cheese, then the parm-reggiano over the tomato sauce. Top with evenly distributed sliced mushrooms and tomatoes before popping in 500 deg. oven for 15-20 minutes, or until the cheese has caramelized. This pizza will bake for longer because the crust is thicker.
Classic margherita pizza
This is my favorite, one I'm sure to order especially at a new establishment. You can't, or shouldn't be able to, go wrong with a classic margherita pizza. You can make this thin crust by rolling it free form to 1/8 of an inch, or thick crust as pictured above. This was my very first attempt at making pizza at home, without making the crust (taking baby steps). If you don't have the time, or don't feel up to making pizza dough, Trader Joe's sells 3 kinds of pizza dough. The one pictured is their herb garlic pizza dough.
Margherita Pizza
1/2 ball of fresh mozzarella, sliced
2 Roma tomatoes, diced or sliced
1 handful fresh basil leaves
3 tablespoons tomato sauce
1/3 cup Parmigiano-Reggiano or Pecorino Romano
Instructions
Brush your rolled out dough with a little olive oil, and then spread your tomato sauce evenly over the surface. Layer first the fresh mozzarella, then the parm-reggiano, roma tomatoes, and finally the fresh basil leaves. Bake in a 500 deg. oven 12-15 minutes for thin crust, 15-18 minutes for thick crust, or until a nice caramelization has formed as pictured above.
Black bean and goat cheese Pizza
This is the newest pizza we made, on the same night we accomplished roasted rack of lamb. Now you can see why we were exhausted. This recipe was inspired by the scrumptious Spicy Chicken and 3 Cheese Pizza at Max Brenner's. Because I don't eat chicken, this was a meatless pizza. If you wanted, you could totally put the meat back on the pizza by using pre-cooked chicken. We also couldn't find jalapenos so this was a non-spicy pizza. If you have jalapenos, definitely utilize them on this pizza.
Black Bean and Goat Cheese Pizza
1/2 cup canned black beans, drained
1/2 cup goat cheese
1/2 ball fresh mozzarella, sliced
1/2 cup shredded Parmigiano-Reggiano or Pecorino Romano
3 tablespoons tomato sauce (made by mixing Hunt's tomato sauce, and tomato paste to get a strong, bright tomato flavor)
1/2 cup diced cherry tomatoes
Instructions
This is a thin crust pizza, so roll out to 1/8 inch thick, free form, sliding onto a oiled baking sheet. As always, brush the surface of the dough with a light layer of olive oil. The layering of this pizza is important, because I got it wrong the first time.
Even spread the tomato sauce across the surface of the pizza. Then layer the goat cheese, and black beans, before topping with fresh mozzarella, parm-reggiano, and diced tomatoes.
You want the goat cheese under everything else because you want the goat cheese to remain moist. When I made this, I crumbled the goat cheese on top, which dried out the goat cheese and prevented the mozzarella from caramelizing all over.
Bake at 500 deg.F for 12-18 minutes, or until cheese has caramelized.
EAT RIGHT AWAY! ^_^